DEV LOG
Week 7, 21/10/19
List of Tasks planned for this week:
Gather assetsBuildingsSaloon 1: 3D SessionsBuilding 2: shorturl.at/dlRX5
VehiclesTrain: shorturl.at/jorS3Track: shorturl.at/jorS3
LandscapeDesert: Landscape backgrounds by Gokhan Karadayi http://gkaradayi.com/
- UE4
BlueprintsTrain Movement
Place assets in sceneTrain & TrackPlayersBuildingsLandscapes
- Controls
Bind Buzz controllersBind keyboardPossibly Bind Xbox 360 controller – Wont work
Current Position –
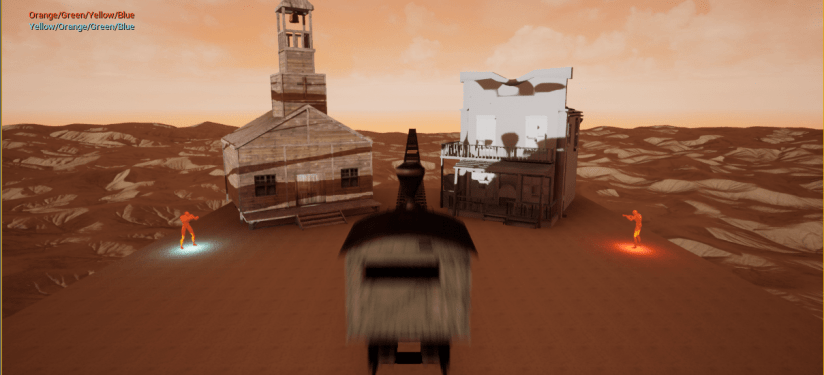
Building my Scene
The First thing that I am going to do is to build my game level and layout all of my assets spawn points and buildings. First I placed in the terrain from the terrain pack that I got from the UE4 marketplace and arranged them in the scene so that they all snap together and form a nice desert dune environment for me to build my level upon. After that I placed the rail track through the middle of the scene and aligned the train on top of it and kept a record of the coordinates to help me when I need to spawn the train in the correct position.
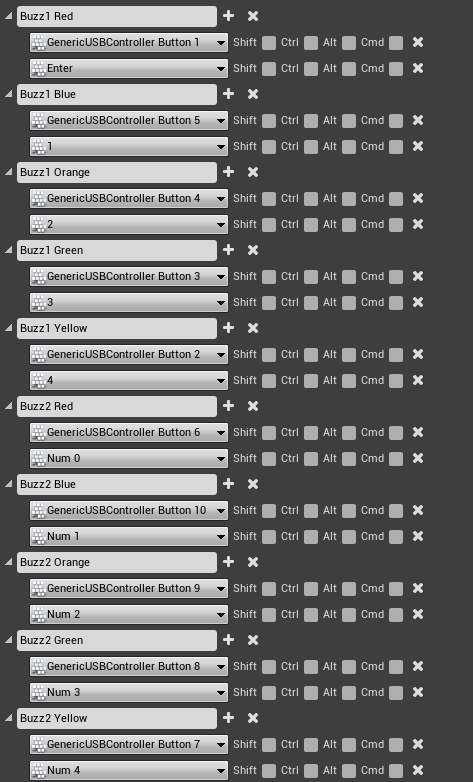
Control Binding
The next thing I did was to bind all of the Buzz controllers buttons to a action for example the player 1 controllers red buzzer is assigned to “Buzz1 Red” so that when I need to use that button i can call on “Buzz1 Red”. I have also gone through and mapped a keyboard button to all of the inputs so that people without a Buzz controller can still play the game but they are going to have a tough time doing so. I have encountered multiple issues while trying to map the Buzz controllers as UE4 does not support them by default so a custom plugin was required to make the Buzz controllers able to be recognised by UE4.
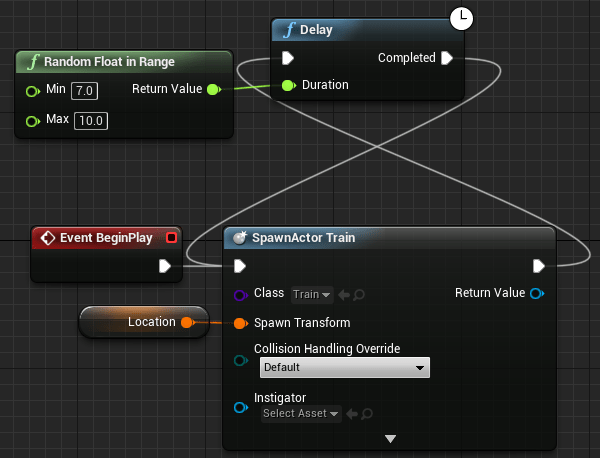
Train Spawning
Next I am going to work on Spawning the train. For this I am going to need the coordinates of where I placed the place holding train so that I can be sure that I am spawning the train the the correct position and that it is not going to get in the way of the camera or any of the game-play elements. I am also going to put a consent spawning loop with a randomized delay of around 7 -10 seconds as I have tested the time it takes for the train to clear the immediate area of the map so that trains do not collide causing issues.
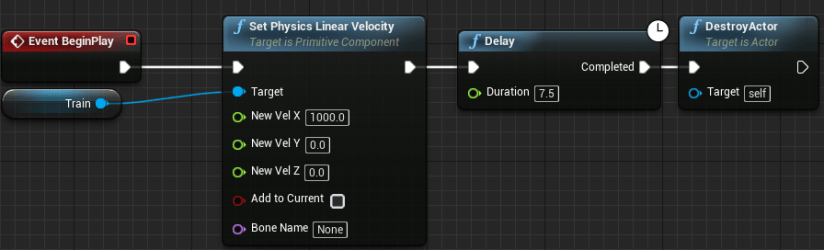
Train Movement
The Finale thing I did this week was to enable the train to move forward across the track and then delete its self. For this I started with testing different speed values for the train so that the train would move at a realistic speed and not insanely fast or sluggishly slow and becomes annoying. After various testing I settled for a X Velocity of 1000. I also put a 7.5 second delay until the train then deletes itself i have picked 7.5 seconds as that is the time that it takes for the train to reach where I want it to be before I destroy it. I am destroying it as after it has travelled a certain distance it become pointless as you cannot see it and will eventually cause lag.
Planning for next week –
- How do I plan to catch up?
- Do I need to change anything about my work or planning?
Next week I am going to start building some of the gameplay features such as: the colour selection so that the colours are randomized and not the same, Using the Buzz controllers to input the colour code So that the players are able to use the Buzz controllers properly, possibly the firing of the gun so that players are able to win the game, And the restarting but I will only be able to do this if I have enough time.
Week 8 28/10/19
List of Tasks planned for this week:
- UE4
- Blueprints
Colour selectionColour deleting (So no copy’s)Input checkingFiring- Restarting
- Blueprints
Current Position –
- What did I do this week and why did I do it? (Screenshots/Videos/Photos)
- What did I find difficult or easy?
- What tasks didn’t I complete from this week?
Colour selection
The first thing I did this week was to start creating the gameplay blueprints. I begun with creating the colour selection process. Here is the base loop for the colour selection process. First the player 1’s colours are selected four times by running the “Set colours” function four times so that the player will have four colours to input. The the colours for player two are selected. After doing this the game prints the players colours to their side of the play screen so that they are able to see what they need to input to be able to win the game.

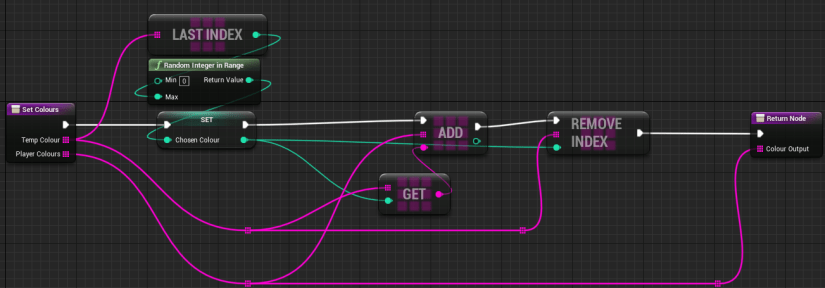
“Set colours” blueprint
Here is the colour selection blueprint that i made while creating the colour selection blueprint to help with adding the colours that have been selected for each player to be different and not contain any duplicates of colours for example not “Blue, Blue, Yellow, Orange”. How it works is it first it generates a random number between Zero and the amount of colours left. Then it adds the colour that responds to the number that has been chosen and ads it to an array(List) called “Player Colours” and removes the chosen colour from the list of colours so that it cannot be picked again. This function gets ran four times for each player.
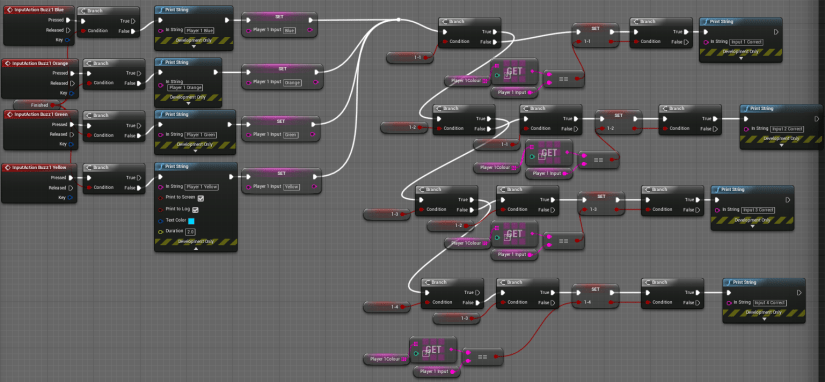
Input checking
Next I moved onto creating the blueprint to detect if the players input has been inputted correctly and in the correct order. This task took me some time to complete as I encountered many issues and confusion at many steps but eventually I ended up with this. First it waits for a input from the player either those being Blue(1), Orange(2), Green(3), Yellow(4), Or Red(Enter) For player one, And the same colours or the Numpad numbers for player Two with the exception for players two’s red which is Numpad 0. Next it checks if the input matches with the colours that have been randomly generated previously. Then it marks the current input as correct which allows it to move onto the next input. This process repeats until the player wins or looses.
Firing & Winning
Next I moved onto creating the blueprint for the firing and winning part of the game after the input checking section. First it waits for either player to input “Red” Then it checks if all the inputs have been correct in the input checking. After this it plays the UE4 base explosion sound to imitate a gun firing. Then the player that is being shot at’s capsule collider that is enabling it to stand is deleted and the physics on the player skeletal mesh is activated enabling the player to rag-doll making it look as though the player is dead. The final stage will be to show the Winning text on the UI.

Planning for next week –
- How do I plan to catch up?
- Do I need to change anything about my work or planning?
Unfortunately I was not able to complete the restarting process of the game however all the other tasks were complete. Next week I am going to finish of the restarting blueprint and begin to work on creating all of the UI features that I am going to need to show the players their colour codes and who wins the game.
Week 9, 4/11/19
List of Tasks planned for this week:
UE4HUDDesign the HUDBlueprints for the HUD Text
GameplayRestarting
Current Position –
- What did I do this week and why did I do it? (Screenshots/Videos/Photos)
- What did I find difficult or easy?
- What tasks didn’t I complete from this week?
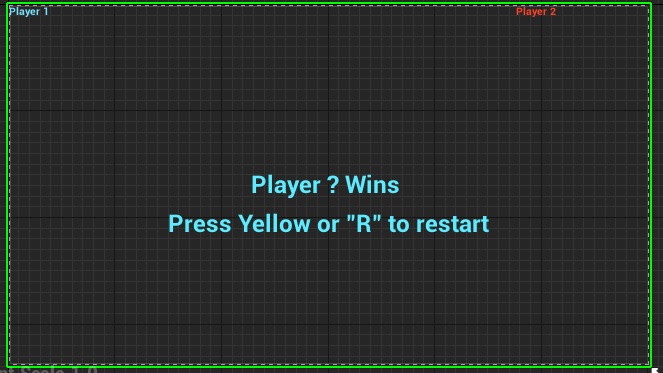
HUD Design
First I decided to design the UI that will be displayed when the game is active and the player is currently playing a game. In the top left player 1’s colours are going to be displayed so that the player knows what they have to input to be able to win the game. In the top left are player 2’s colours similar to player 1’s. In the middle text will be text to tell the players who has won the game and to show the how to restart the game and play again.
HUD Display Blueprint
After designing the HUD I decided to create the blueprint that displays the UI onto the screen while playing. First it waits for all of the colour selection to have been done so that it is able to show the player what they need to input to be able to win the game. Then it creates a UI widget called “HUD2 and assigns it a variable. Next it gets the value of both “Text1” and “Text2” which are the text that is put at the top corners of the screen and assigns them the colour codes for each player so that the players can see their colour code. And finally it adds the UI to the viewport so that it can be seen.

Finally I started working on the restarting section of the blueprint. Firstly it waits for the game to be finished and for one of the players to die, After that it sets the blank text box in the middle of the screen to “Press Yellow or “R” to restart” This lets the player know how to restart the game and play again. then it waits a second before it allows a restart to be triggered so that player don not accidentally restart their game. Then it waits for a yellow or “R” input from either player. Then it checks if a restart is available so that it is not accidentally triggered. After this it has another two second delay before restarting the game.

Week Number & Date:
List of Tasks planned for this week:
Current Position –
- What did I do this week and why did I do it? (Screenshots/Videos/Photos)
- What did I find difficult or easy?
- What tasks didn’t I complete from this week?
Planning for next week –
- How do I plan to catch up?
- Do I need to change anything about my work or planning?
